Thursday, 7 May 2015

Angry Birds Maze and Scratch

This week we have been focusing on digital programming using algorithms.  We were asked to choose and complete a digital learning challenge. I selected programming a robot which was completing the Angry Birds maze on the Hour of Code website.  When I first clicked on the link to take me to this page it began with simple video of how to use the coloured blocks to program the Angry Bird to move to the Naughty Pig.  After the video is complete the player was invited to complete the maze using the steps demonstrated in the video.  Every few mazes there was a new instructional video which took your knowledge and skills to the next level in order to be able to program more efficiently to progress through the game - see screenshots below.


At the beginning of this game I found it quite easy to program the Angry Bird as it used simple instructions such as 'when run' followed by 'move forward' or 'turn left or right.'  However, as I began to advance to the higher levels, I found that being able to move the character using programmed repetitive actions and fewer blocks was more complicated and required me to think critically before making the action to avoid my character running into a wall or water, then failing at that level.  Completing this game in the classroom with a group of students would assist them to understand how simple software works and how to define problems by following a sequence of steps and decisions (algorithms) needed to find a solution, i.e. process and production skills in the Year 3/4 Digital Technologies curriculum (ACARA, n.d.). 
 
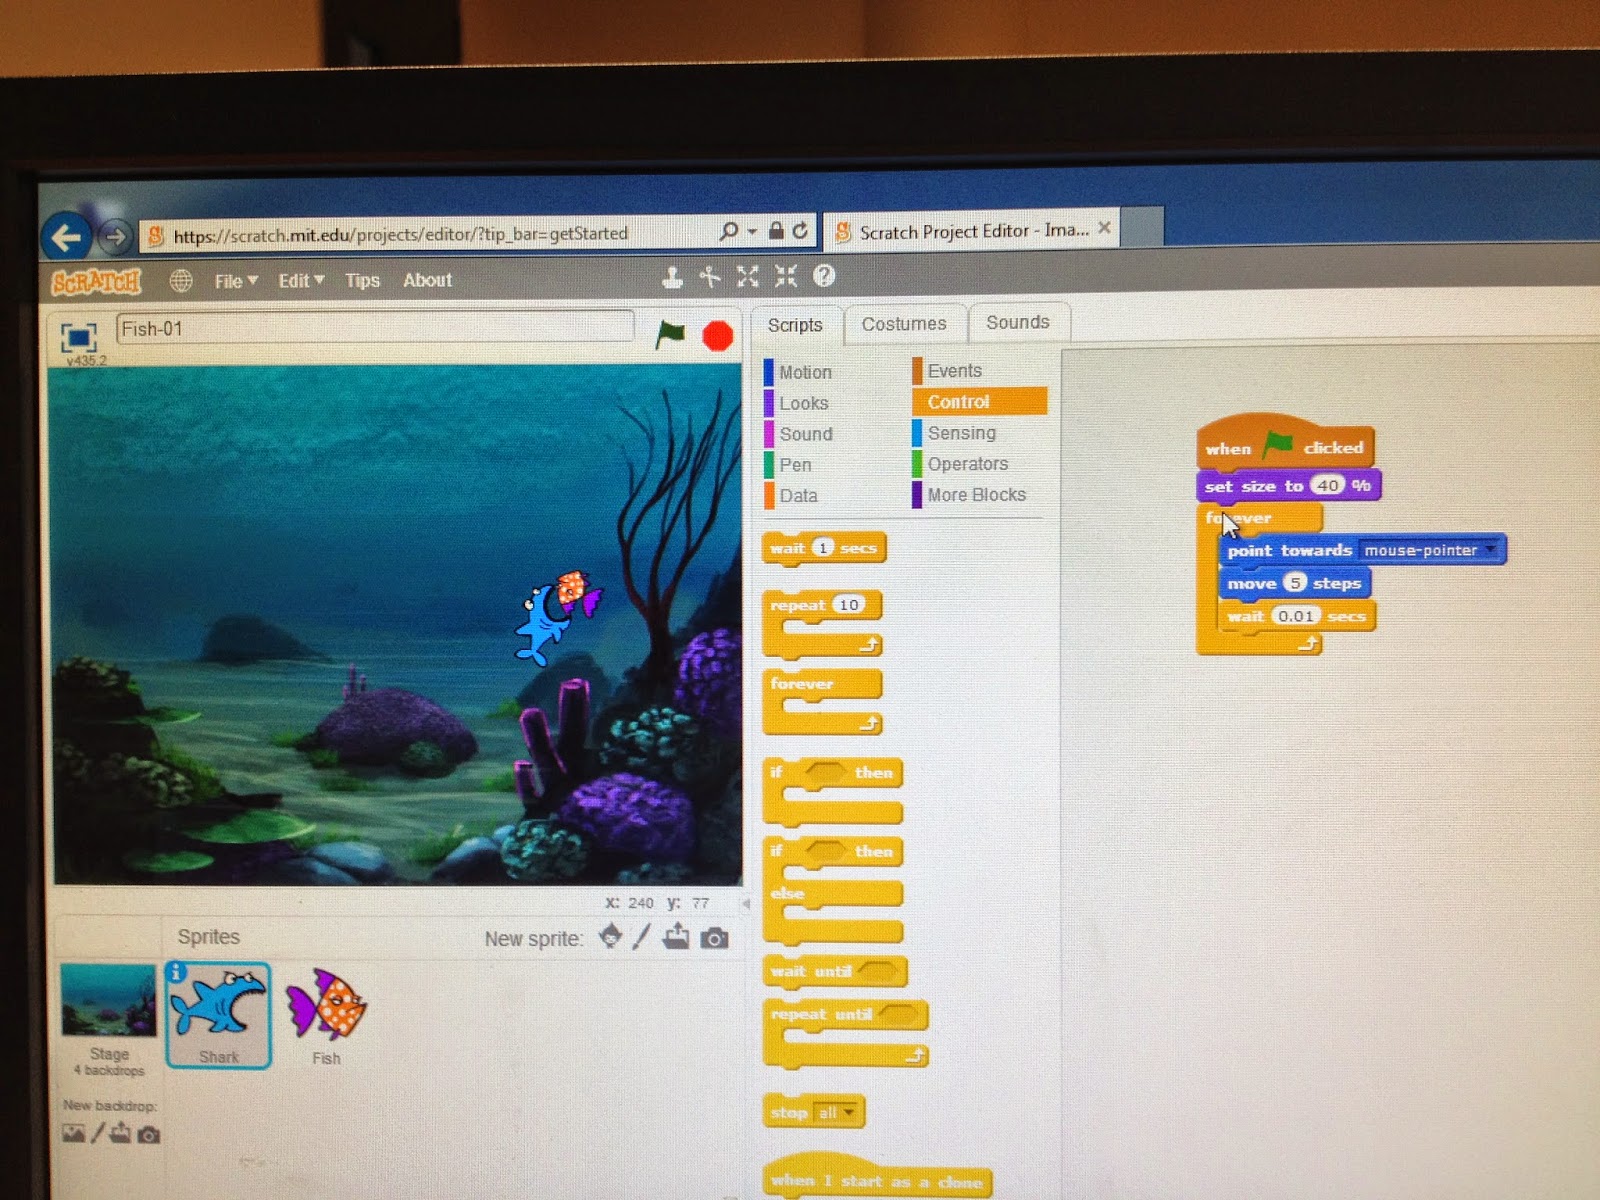
Another digital system that was explored this week was 'Scratch', which is a free online program used to create interactive stories, games and animations.  We explored this by creating our own game using blocks and sets of algorithms.  I was pleased I had completed the Angry Birds maze prior to attempting to code this game as those skills assisted me to understand the purpose of the blocks in terms of making the characters move.  Fortunately I had a worksheet which outlined the order in which to list the blocks to make the characters (shark and fish) complete the correct actions.  First the shark character was programmed to move around the fish tank with the mouse pointer.  Once this was completed a fish was added and programmed to swim around on its own.  After the two characters were programmed to complete these basic actions it was time to make the shark eat the fish with an embedded sound and then program the fish to reappear in order for the game to continue.  To add more fish in the tank 'duplicate' was selected and three more fish entered the tank and completed the same action as the one that had been programmed previously, and their colour and actions could be altered to suit the game.  The scoring system was then programmed in order to change the animation into a game. To do this the score function is selected so that each time the shark eats a fish a point is scored; however, each time the fish eats an octopus (another character I created), a point was lost.  I was able to program the shark to eat the fish, have the fish reappear and the point scoring take place. I found it difficult to program the steps needed for the shark to lose a point when it ate an octopus.  The screenshots below demonstrate the different stages of the game and the coding which was completed to this point:


I found that this programming was a large skill leap from the simple algorithms used in the Angry Birds maze and my frustration levels were tested at some points in the process; however, once I had experimented with the different command blocks and functions, I found that I was able to understand how to program the characters to complete actions in a more efficient manner.  Utilising the 'Scratch' program to create a game with these more complex steps could link into the Year 5/6 Digital Technologies curriculum processes and production skills as it involved modifying and describing game design in alignment with commands.  There are also multiple options for the instructions, such as forcing the program to make a choice between two options using an 'if' statement, such as 'when the shark touches the fish it eats it, if it doesn't touch the fish it can keep swimming and bounce off the side of the tank.'  In addition, this software experiments with concepts such as programmed loops to repeat actions multiple times, using limited command blocks for efficiency (ACARA, n.d. http://www.australiancurriculum.edu.au/technologies/digital-technologies/curriculum/f-10?layout=1).
 
Overall, although games are often considered 'time wasters' within the classroom environment, my learning experience with the Angry Birds maze and 'Scratch' activities demonstrated that programming could have many benefits for students.  These include computational and critical thinking skills, persistence, creativity and satisfaction when achieving their final goal of creating a 'working' game.  In addition, programming games is an element within the Digital Technologies curriculum which needs to be explored digitally rather than 'unplugged' for students to have a kinaesthetic experience with the programs.  Who knows - perhaps a child in your classroom may be the next great creator of internationally popular games like Angry Birds or Minecraft if they are provided with the opportunity to utilise and develop programming skills during the early years of their education.
 
Participating in weekly digital challenges using a range of digital systems including Wordle, Bubbl.us, Twitter, YouTube, Easel.ly, Wikis, Angry Birds maze, 'Scratch' and this blog has expanded my horizons regarding the ways in which technology can be used with students in the classroom to enhance learning.  Not only does it allow them to engage with personal reflection, inputting data, creating visual representations, programming and receiving peer feedback, it also enables students to become critical and computational thinkers and find solutions to a range of problems.  I have therefore changed from my initial, less positive thoughts about programming and 'gaming' in the classroom to agreeing that, in the digital age, students (and therefore educators) need digital technologies to be embedded in their learning in order to be aware of what is available and what is possible in the future to prepare them for a range of jobs or problems which may not have been created yet (VideoShredHead, 2012 https://www.youtube.com/watch?v=YmwwrGV_aiE).

Monday, 4 May 2015

Computational thinking

Back in Weeks 1 and 2 we began to explore the concept of computational thinking however, this week it was revisited in more depth.  According to Stephenson & Barr (2012) "computational thinking is a problem-solving methodology that can be automated, transferred and applied across subjects."  The Australian Curriculum states that through computational thinking students can develop transferrable knowledge and skills across curriculum areas and their personal life (ACARA, n.d.).  Through utilising this kind of thinking "students become not merely users but tool builders" (Stephenson & Barr, 2012), putting their critical and creative  thinking skills into action in order to solve problems they become actively involved in the process as opposed to being static users. 

Computational thinking is a key term throughout the Digital Technologies curriculum, in particular the thinking processes involved which are:
  1. Decomposition - taking problems and breaking them down into more manageable sections
  2. Patterns - grouping according to similarities and differences
  3. Abstraction - taking details of a problem to make a solution work for many different problems
  4. Algorithms - a set of instructions for completing a task (ACARA, n.d.; ThinkingMyself, 2011)
By utilising the processes listed above students can devise a solution to the problem as they have used critical thinking skills to consider the most effective way to complete a task.  I thought that the image below was a simple way to explain computational thinking concepts and approaches.

Sourced from: http://barefootcas.org.uk/barefoot-primary-computing-resources/concepts/computational-thinking/

So what could computational thinking in the primary curriculum look like?  It can take many forms and does not have to be completed digitally it can also be used for 'unplugged' activities for example in science where children may be doing a unit on the weather  and be required to work out what types of clothes they need in winter or summer (decomposing) (CAS Barefoot, 2014).  They may then need to create a set of instructions for someone to follow in order to adequately get dressed (algorithms) (CAS Barefoot, 2013).  We completed an 'unplugged' activity in our lecture this week which was programming a robots emotions using three facial features (eyebrows, eyes and mouth) with five different options for eyebrows and eyes and three for the mouth labelled A, B, C, D and E.  We first cut out three strips (eyebrows, eyes and mouth) and then inserted this into the robots three slits which were carefully cut into his face following the red lines.  This allowed us to freely move the strips in and out to programme the emotions so that they could become interchangeable - see images below.

This is the paper robot and its emotion machine.  As you can see above the robot is happy which is represented by the code AAA however, this can be changed to portray a range of emotions using this simple coding system (see below).
 

 To program angry the code would be BEB
 
 
To program sad the code would be ABB

 
To program surprised the code would be EAC

This coding required use of the computational thinking processes, in particular creating algorithms and code in order to represent the different emotions.  I found completing this activity was simple and fun and I think it would be an engaging activity to complete with students in the classroom to introduce them to 'unplugged' ways of coding and realise it does not only have to be completed using digital systems.  From the activity above it is clear that computational thinking is therefore not only a valuable skill to have for computer programming, but it is one which can be utilised across a range of different activities and subject areas and is a beneficial tool to enhance students problem solving skills.

Wednesday, 29 April 2015

Infographics


This week our focus was on infographics which "combine visual literacy with data analysis to portray a visual representation that leads the reader to a clear conclusion" (Fasso, 2015).  We looked at a selection of infographics and decided which one we felt was the most powerful for representing data.  I thought that the above infographic (received from CQUniversity, 2015) was the most powerful combination of visual literacy and data as it utilised symbols to represent the number of deaths by the disease or war which acted as a simple comparative method. 

We asked this week to explore a variety of different templates for infographics at easel.ly.com and then create our own using one of the templates.  I decided to make an infographic about the types of household pets we have in Australia and which are the most popular according to the data and percentages by the Australian Bureau of Statistics (data sourced from http://www.abs.gov.au/AUSSTATS/abs@.nsf/2f762f95845417aeca25706c00834efa/5ef8016f420622a3ca2570ec00753524!OpenDocument) as animals is a topic that interests me.  The data was from 1994 (the year I was born) and although this is clearly out dated the point of my infographic was to learn how to create them and why visual literacy can be so powerful.  I chose a template within the easel.ly website and modified it to suit my data.  At first I found this to be a challenging process as each image or text box you no longer required had to be deleted individually, but once I practised utilising the program it was satisfying to see the data take shape in a colourful online platform.  I used images provided within the website and also uploaded a range of images for my infographic* in order to enhance its aesthetic appeal.  As in the infographic above on pandemic vs war I chose symbols/images to represent the animals and minimal text to display my data.  The link to my infographic can be found below:

Most common household pets infographic 

Although my infographic was very simple it still took a long time to create as each image or text box was dragged across the screen and individually placed, colours and fonts were changed and I assessed it constantly in terms of whether it was an effective tool with which to display the data.  I would therefore say that a drawback of using infographics would be time consumption and the desire for perfection.  In saying that, I feel that they have great potential within the 21st century environment as they intertwine design and technology to creatively and visually represent data to an audience in an efficient way.  From looking at different infographics it was clear that information was much easier to access as it was decomposed into smaller, more manageable facts as opposed to reading through pages of a document to find the key data.  This could be useful in the classroom environment as students would not need to become overwhelmed with text and could instead focus on evaluating the facts at hand.  In addition, using programs such as easel.ly within the classroom could allow students to present data of their own possibly in the form of assessment using a digital tool in a creative and efficient way.  Finally this online tool means that it can easily be accessed and viewed by the child creator, peers, parents or teachers by using the shareable link, adding members to the website or by embedding the infographic to a blog or other online journal.  This in turn, broadens the learning environment from static to collective (The ASIDE Blog, 2015) where feedback can be given and accessed from a range of viewers. 


*Images for infographic were sourced from:

Cat: http://my.net-link.net/~cwjohnso/genetics/shadedfin2.html

Thursday, 23 April 2015

Culminating blog reflection
 
Well, my design challenge has now been completed and the plants in the upcycled garden bed are continuing to flourish.  The final stage is a satisfying place to be although creation of the final product was definitely not without its challenges.  Over the past six weeks, I have undertaken the design cycle from investigating an idea, developing a plan, creating the product and evaluating the finished product in terms of its advantages and disadvantages. This encompassed all the steps outlined in the Cobus Botes website diagram below.  Through completing the steps practically myself, assuming the role of a student undertaking a project, I believe I learnt a lot more about the stages of designing a product - the trials and tribulations, frustrations and sense of satisfaction - than I would had I only observed and advised students in the educator role.  This gave me an insight into the steps children may take in creating a design challenge which, in turn, has equipped me with additional pedagogical skills to utilise in my teaching career.  In this way I can incorporate not only the theoretical elements of design, but personal practical experience enabling me to empathise with students who might be experiencing frustration, and draw on that past experience to help them plan and achieve their design from inception to completion. 
 
The readings, diagrams and videos embedded throughout Moodle each week assisted me to scaffold my learning about the design in a step by step process, breaking it down into stages rather than approaching it as one large task.  I always found great relevance between the course materials and what I was learning by practically completing steps for the design challenge.  Each week I was able to reflect upon an element that was crucial to the development of the design. These included:
 
Throughout the stages noted above, I learnt a great deal about how much there is to consider when developing a product and the importance of completing the research process thoroughly in order to create the ultimate goal of a perfect design. I found that the decision-making matrix was an excellent way to order my ideas about which materials to use and why they would or would not be effective in my design.  In addition, I was able to look at a wide range of other properties in relation to the materials - including cost, toxicity to environment, size, absorption, space for planting, durability when exposed to the weather and practicality - in a table form which was quick and easy to create and evaluate (see below).

Fish tank
Cupcake tray, teapot, pan and ironing board
Boots
Soil and plants
Criteria
1
2
4
5
Total Cost
Cost
$7.00
$10.50
$3.00
$28.00
$48.50
Toxic to environment
Low
Low - rust
Low
N/A
Size
Small
Small to Medium
Small
Small
Absorption
High
High
Low
N/A
Space for planting
Medium
Small
Medium
N/A
Durability in weather
High
Medium - rust over time
Medium rot over time
N/A
Practicality
ü
ü
ü
ü


Prior to creating the final product, I also undertook a Risk Assessment of the challenge which was completed from an educator's perspective of possible risks associated with the creating stage of the upcycled garden. When thinking critically about the steps involved, I realised that there were a number of potential risks associated with this activity, arising from the materials and tools used in its creation, which required control measures. I was therefore pleased that I had identified the upper primary (Years 5/6) age group as the appropriate one to complete the task (refer to the Wiki page for Risk Assessment).

Once I had decided upon my materials and completed a Risk Assessment it was time to begin making the garden beds.  The first step was to attach the empty tea pot, cupcake tray, pan and shoes to the ironing board using fencing and coat hanger wire, which I bent to shape using pliers, and shoe laces which I tied to the ironing board frame.  Once I had ensured that this was secure, I began drilling holes into the bottom of the objects for water drainage so that when they were watered excess water could escape so the plants would not become waterlogged.  This process was more challenging than I had first anticipated as the pan and tea pot were made of stainless steel and therefore I had to use a metal hole punch and hammer to put holes into the base as the drill merely slid off the surface.  This process was far more time consuming than drilling through rubber shoe soles and the cupcake tray. Upon reflection, I decided that if this project was completed again for children in a classroom environment, I would encourage them to use material other than stainless steel due to the degree of difficulty I experienced.  Once I had placed holes into the bottom of each object it was time to plant the seedlings.  I bought a big bag of potting mix, potted colour plants - petunias and violas - and herb seedlings for the planting process and, for aesthetic purposes, the petunias would be planted into the shoes so that they could grow and spill over and the violas into the remainder of the hanging objects. 


There was one final component to the design which was not yet complete - the fish tank with five separate sections originally designed to house Siamese fighting fish.  In it I decided to plant an array of herbs including chives, parsley, oregano and thyme, and one petunia seedling (see images above).  Upon completing the initial decision making matrix in which I examined the properties of different materials (see below), I decided that the aesthetic features of glass and the fact that it had adequate space for planting and would be durable in most weather (aside from a hailstorm) made it a suitable material for an upcycled garden bed.  However, this provided some challenges as the fish tank could not have holes placed into it for water drainage as drilling or pushing holes into the glass would cause it to break and shatter. This has meant that I have to be very careful about the amount of water I put onto the herbs and how frequently I water them to avoid over watering which will cause them to die.  In addition, when posting my final product on my blog and Wiki page, several group members commented on the fish tank not being attached to the ironing board and whether this would create an issue in stormy weather conditions if it fell and broke.  Although the fish tank is heavy now that it is full of soil and plants, I agree that it sitting unsecured on top of the ironing board is a bit precarious and therefore decided that, in severe weather, where possible I would remove it from the ironing board and place it on the ground and under cover to minimise the risk of it shattering. 


Criteria
Glass 
Metal
Wood
Fabric
Non-breakable
ý
ü
ü
ü
Light weight
 
ý
ü
ý
ü
Able to be hung from ironing board
ý
ü
ý
ü
Space for plants and soil
ü
ü
ý
ü
Durability in weather
ü
ý
ý
ý

The peer feedback was a benefit for me as it allowed me to think critically about my design, how it could be improved for the future and, if I was to complete this activity with a class of students, what things I would do differently. I found that constructive criticism helped to direct my thought process and was not a challenge but a benefit.  The group I was part of balanced the feedback with positive and constructive comments, and this assisted in the evaluation process as there were a mix of things to reflect on.  However, I found it challenging to give constructive feedback to my peers as I thought their designs were all so unique and personal and knew how much time and effort had gone into them, so felt that critiquing an element in the wrong way could come across as negative. I eventually found that a happy medium for me was to ask questions to clarify elements of their design about which I was unsure.  In this way my feedback did not come across as critical, but more inquisitive and interested.

My design had a strong focus on sustainability by reducing, reusing and recycling products into something new. This concept of sustainable thinking and eco-design, which considers the process of materials from raw extraction through to disposal, is becoming an increasingly popular in our society as people strive to make sustainable and environmentally friendly choices in their day to day life (Manufacturing Skills Australia, 2015). Students understanding this concept is crucial as they realise that "sustainability is about meeting the needs of current generations, without compromising the ability of future generations to meet their needs" (Our common future, 1987 featured in The Good Design Guide, 2014).  This process allows them to think critically about their design and its environmental impacts, as well as the projected environmental impacts of mass produced materials such as plastics and what alternatives can be used, thus linking elements of the Design Technologies Curriculum to the cross curriculum priority of Sustainability (ACARA, n.d.).

Overall, I am satisfied with the final concept and product of my design challenge and the possibilities it offers students to think critically and sustainably.  The take home lessons for me from completing a design challenge, through the phases of the design cycle, were that it is acceptable to modify your original concept several times until you are happy with the final prototype; that your decisions are not always thoroughly and critically thought through and that you learn through trial and error; and that peer feedback in the form of constructive criticism can assist you in improving your design resulting in a better outcome.  I also learnt that you do not need to be an "arty/crafty" person or a designer to come up with a design that serves a purpose, which for me was an outdoor garden which reduced our impact on the environment by reusing old materials to create something new, as well as being able to use the herbs in cooking and salads.  I now have a greater appreciation for the challenges students in the Design Technologies strand may face and how to assist them to work through those and persevere to reach the satisfaction of having made the final product.  When reflecting upon my design I am very proud of what I achieved and satisfied with the process of creating from conception through to the finished piece.  Although there are things I would do differently if I made an upcycled garden again, as noted above, I learnt from these mistakes, which is a critical part of the learning experience.


Two weeks later my garden has grown and flowers and herbs have begun to sprout (see below). To track the garden's current progress please use the following link: http://sarahtechyspace.blogspot.com.au/2015/04/how-my-upcycled-garden-is-progressing.html